Kubernetes and Jenkins: A Brief Introduction
The IT industry is now quickly moving towards using containers in software development. The reason behind this is that the containers are a very cost-effective solution, and also they decrease the time needed for development. To manage these containers, orchestration tools like it come into play and business needs to set up its with it. However, before taking you further, let's get a quick idea about Jenkins and Kubernetes.
It is an open-source tool created by Google; it manages containers and also takes care of their failure. It supports the majority of CI/CD tools and Kubernetes Security tools which allow developers to run tests, deploy builds and update the application without any downtime.
Click here to know more about Kubernetes Architecture and its Components
It is one of the most popular CI/CD tools; it is so popular because it monitors tasks repeatedly. During the development phase and shows errors in the early stages of the development. This blog will focus on how to set up them.
What are the prerequisites to Configure?
- A Linux system (in my case I’m using Linux).
- Kubernetes (minikube) and Docker should be installed in the system.
3 Steps to set up it on Kubernetes Cluster
Steps to set up it on its cluster are:
Create a YAML File
apiVersion: apps/v1 kind: Deployment metadata: name: jenkins labels: app: jenk spec: replicas: selector: matchLabels: app: jenk template: metadata: labels: app: jenk spec: containers: - name: jenks image: jenkins ports: - containerPort: 8080 volumeMounts: - name: jenk-vol mountPath: /var/jenkins volumes: - name: vol emptyDir: {} Save this file as jenkins.yaml. In this deployment, I am using emptyDir volumes, but we can also use other volumes like persistent volume and persistent volume claim.
Create a YAML file for its service and save it as jenk-svc.yml apiVersion: v1 kind: Service metadata: name: jenkins-service spec: selector: app: jenk type: NodePort ports: - name: jenkines-svc port: 8080 nodePort: 30002 Start the minikube in your system: sudo minikube start --vm-driver = none Start the minikube using the command: sudo minikube start --vm-driver=none Create Jenkins deployment: kubectl create -f jenkins.yaml This command will pull it images from the Docker repositories like Docker Hub and create a pod with one replica.
Create Jenkins Service
Its deployment is created in the last step, but it is not accessible to the outside world, to make it accessible. This is why users are stuck in queries like how to set up it on Kubernetes. For this, we use services, I am using the NodePort service. We use kubectl create -f jenk-svc.yml to create the service on Kubernetes, here jenk-svc.yml is the YAML file we created earlier. If you don’t want to create the service YAML file you can expose the deployment using the command: kubectl expose deployment --port= --type=. The NodePort will expose it on all nodes' IPs, and also we are using port 30002 so we can access it on port 300002 to set up.
We can check our Deployment and service details using commands and Sudo kubectl get pods. Kubectl gets deployment Kubectl to get svc.
We can also manage our Deployment using dashboard: Command: sudo minikube dashboard. This command will generate a URL that leads us to the minikube dashboard. In that dashboard, we will get all the details of deployment, pods, and services. We can also manage these using the dashboard. 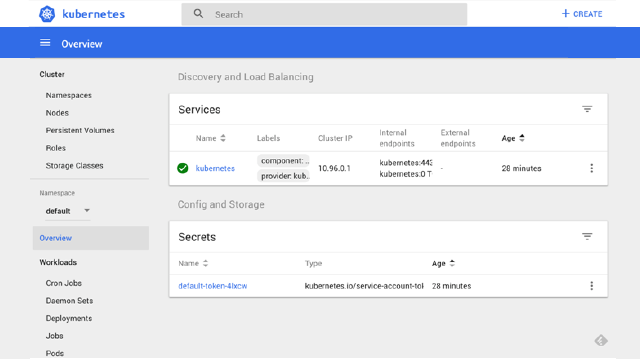 After Deployment is done on Kubernetes we will find our pod name using the command: Sudo kubectl get pods.
 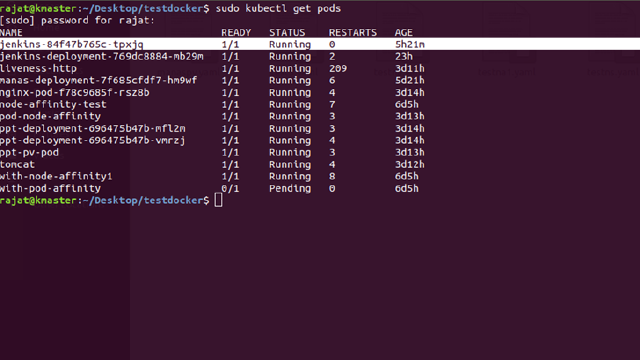 Here the name of my Jenkins pod is Jenkins-84f47b765c-tpxjq, after getting the name of the pod now we will find the password of it, without that password we can not access it. To find that we use command kubectl logs Jenkins-84f47b765c - tpxjq. The password will be at the end of the logs.
 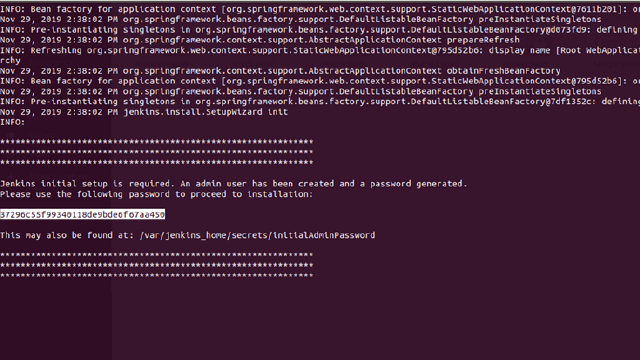 We can also find this password at location: /var/jenkins_home / secrets/initial Admin Password inside the pod.
Access Jenkins Using Browser
After finding the password now, we will access it using a browser. For this, first of all, we will find the IP using the command sudo minikube IP. We will use that IP with NodePort to access it in a browser (IP:port), in my case I used port 30002 in the NodePort service so I will use 183.183.183.20:30002 to access the it. After browsing the IP on port 30002 we will get into it. At first, Jenkin will ask for the password that we found earlier without that password we can not unlock it. 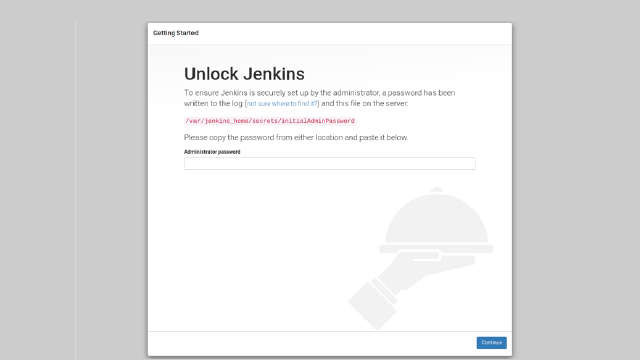 After entering the password we will get into the sign-up page of it, there we can create a new admin user to access the its Dashboard, or we can use the default admin user to get into the dashboard of it. This will proceed to set up it on Kubernetes.
 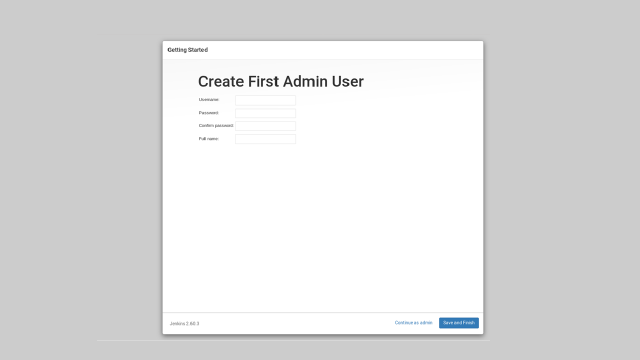 After signing up there, we will get into the Dashboard of it where we can perform our CI/CD tasks.
Conclusion
Jenkins has an extensive plugin repository that could help you perform complex operations. You can also add your GitHub repositories, multiple types of worker instances, and more. Try it and let us know if you face any issues in the comment box.
- Discover more Kubernetes Native Serverless Framework
- Click to know Kubernetes Consulting Services
.webp?width=1921&height=622&name=usecase-banner%20(1).webp)


